For my Gamma Dog EXP (External Probe) I wanted to build small and lightweight detector to be mounted on a "Metal Detector style wand".
The weight is important as the detector is basically on the end of a long pole (which is great for covering larger area in a single sweep) and all of the implications from momentum and inertia of a large mass are present. The pole becomes a lever in your hand and the mass on the end of it is fighting changes in its state via momentum and inertia - according to Newton's laws it tries to stay in motion or tries to stay at rest and the results are amplified by the long arm of the lever to the operator's hand.
There is not much that can be done about the crystal - NaI(Tl) is a dense substance and at the end it comes to a compromise between weight and sensitivity - a plastic scintillator would be lighter but less sensitive. I decided to go with a 40 x 80 mm NaI(Tl) crystal. The length of the crystal makes it more sensitive for gammas coming radially to the canister - something which is an advantage due to the angle of the detector in relation to the ground surface (the metal detector wand on which it is mounted puts it at a fairly low angle)
To keep the detector assembly short and light I went with a very low-profile PMT - Photonis XP6242.
XP6242 has a
hybrid multiplier comprising of a very large first dynode coupled
to a foil multiplier.
The length of the entire PMT is about 10cm with the VD board on the back
It is a 10-stage PMT with Gain of 2.5x10^5 and supply voltage of 1000V
The photocathode's diameter is 48mm and the overall PMT diameter is 51mm which works out perfectly for a 40x80mm crystal. Photocathode is larger than the optical interface window of the crystal's housing which means no photons will be wasted. The size difference is small too - the canister's outside diameter is 46mm and the PMT outside diameter is 51mm which means there is no need for centering collar - just a few turns of electrical tape on the crystal's housing will equalize the size difference.
The Voltage Divider was made with 2R (K-Grid and Grid-D1) and R between the dynodes. I used 4.7M for R and 9.4M for the 2R
Since there is no standard 9.4M resistor value for the 2R resistors and the PCB pads are just for a single resistor, I had to use the "tent" mounting technique for these resistors.
The total VD impedance is 65.8M - this is high enough to minimize voltage drop and works well with Gamma Dog's HV supply while improving SNR in case I use it for spectroscopy.
The VD board installed on the back of the PMT. A machined rear cap with a female BNC connector is installed over it. Before installing the cap, I soldered a strip of thin copper foil to the ground terminal and this foil is pinched between the PMT and cap, used to ground the Mu-metal magnetic shielding which also acts as an electrostatic shielding.
These "long" NaI(Tl) crystals are used mainly for oil logging - size is 40 x 80mm.
Typical NOS Soviet-Era type crystal - nice and clear with no yellowing and blemishes. In Spectroscopy mode the resolution is better than 7%. Gamma Dog shows approximately half of the count rate of a 63 x 63mm crystal for natural background.
The rest of the assembly process is straightforward - cleaning with Acetone both optical surfaces (crystal's window and PMT's photocathode window), applying optical interface solution (viscous silicone fluid) between the crystal's window and PMT, cap on the back with BNC connector, electrical tape, grounded mu-metal sheet (connected to ground with copper tape in order to double as an electrostatic shield for the PMT), a few turns of Mu-Metal around PMT overlapping the photocathode and VD board and then more electrical tape and foam.
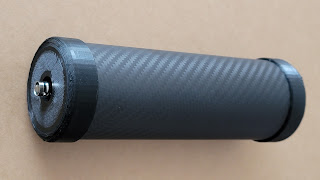
For the detector housing I wanted something strong and lightweight, and the choices I had were Titanium or carbon-fiber tube.
I went with a Carbon Ffiber tube with OD 64mm and 2mm wall thickness. The detector assembly needed only one thin layer of closed-cell rubber foam to fit inside the tube - just like in a glove.
Two 3D printed caps are used to close off the detector assembly.
The design of the caps is such, that the carbon fiber tube is inserted in a precisely sized groove in each cap. There is a beveled inner edge on the top cap sealing the enclosure against the inner detector cap.
The caps are glued with RTV sealant and provide dust and water resistance to the detector.


No comments:
Post a Comment