The idea behind Gamma Dog EXP is to have a self-contained electronics module which I can connect to various external probes. This allows a certain level of flexibility - detectors using smaller crystal can be attached to a wand and used in the "Metal Detector" style setup, sweeping larger areas much faster or an alpha scintillator can be connected to check for contamination. I also use this setup very effectively during mineral shows (sans the wand) and I can quickly sweep across the tables with specimens.
The large internal detector unit is just too big and heavy to be mounted on a pole and the range of scanning around a person with it is limited to an arm's reach.
This is the entire setup mounted on a "Metal Detector" style armrest and pole using a low-profile detector using 40x80 mm NaI(Tl) crystal
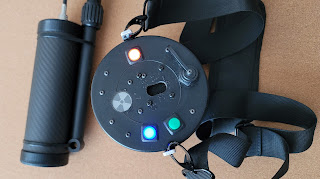
The self-contained electronics module came out pretty compact. It can be placed in a backpack or even hanging from a belt.
Over-the-shoulder strap is another, very convenient way to carry the unit.
`BNC connector for attaching the scintillating probe. Bias voltage is set internally (up to 1000V) and VD impedance of the PMT must be above 60MOhms.
The black cylinder is a 63x63 NaI(Tl) scintillator connected with a short coaxial cable to the Gamma Dog's main board. The 6600mAh LiPo battery is on the right-hand side, speaker + amp, the 3 buttons and the display module can be seen as well.
The electronics modules for my Gamma Dogs - 3 are based on Version 3 Hardware and one unit (used as a Spare/Backup) - is a prototype based on the older Version 2 hardware.
My Gamma Dog pack - ready to hunt for radioactive rocks.
(Menu Selectable)
The mount for the detector was designed with TinkerCad and 3D printed with 100% in-fill for maximum mechanical strength.
Mount is comprised of a lower cup and a top cap. A threaded feed-thru is used to secure the cup to the bottom of the pole. I used a feed-thru to reduce weight and possibly add an elastic strap to pull-down the top cap.
The cap is designed with a slit for the BNC connector and cable. Cap slides over the pole and a pair of 0-rings - one on each side provide friction resistance. This facilitates easy installation or removal of the detector in just a few seconds. The friction from the o-rings is strong enough to lock the detector firmly in place.
If I need to remove the detector, all I need is to pull the top cap up and slide the bottom of the detector into the cup. To lock the detector in place I push the cap down and move the 0-ring right behind it.
The bottom cup provides additional mechanical protection to the detector housing.This type of mount is fully adjustable for various detector lengths and diameters up to 2". Ill probably design another set for detectors with diameter between 2" and 2.5"
My 40x80mm NaI(Tl) compact detector in carbon-fiber housing, mounted at the end of the pole.
P.S. This is old but here is an article in Atlas Obscura on radioactive mineral collecting (shameless self-promotion: I am quoted a couple of times and there are pictures of minerals currently in my own collection).


