Monday, April 25, 2011

Digital Scope for the antenna launcher

Sometimes great ideas shine, just because of their simplicity and I think I had one the other day. (You can tell that I am modest person :-). I am claiming to have the most sophisticated aiming system of any pneumatic antenna deployment apparatus out there.

Here the Head Up Display of my "Augmented Reality Digital Scope". aiming at 56 degree up at a tree-top in my front yard. The scale for pitch (gun barrel angle) is displayed on the right.

The Scope mounted on my "steam-punk" antenna launcher. I know! The mount of the scope should have been made out of wood.

Front view. The Scope mount is attached with Velcro tape to the barrel for easy installation. Calibration of the scope is possible while mounted but it can be performed before installation on a perfectly level surfaces for greater precision.

This is the Scope's quick mount. I fabricated the mount out of aluminum L-stock. A piece of scrap 4" PVC pipe was used for the bottom part. I softened the plastic using heat-gun and formed it to fit tight around the 2.5" barrel. Small Velcro straps are used to secure the instrument in place. It takes about 30 seconds to install or remove the actual scope .

Cross-hair view down the barrel. Scope is secured in the mount and installed on the antenna launcher. Note the blue closed-cell foam padding between the barrel and the mount. It gives a very firm, non-slip grip for the mount

Ta-Daaah! Here is the secret :-))) The Scope is actually my Android OS smart-phone and it cost me absolutely nothing :) (I already had the phone). That's why it was important for me to be able to easily install and remove the phone from the mount. I fabricated the mount to fit my specific model phone - T-Mobile G2 (HTC Desire Z) but it can be modified for any phone.

Another view of the mount. Note the little cut-out for the phone's digital camera. The construction is very light and sturdy. The phone has a gel-skin to protect and further enhance the mounting.

The heart of the aiming system is a free app called GeoCam v.2.07, available on the Android Market or it can be DL from here. I came across this app accidentally and my first thought was - this could be useful for something one day (it used to be called Theodolite). It displays a wealth of information and it can triangulate objects in order to measure distance and height. The phone's accelerometer sensor is used to measure pitch (essential!!) and roll (the roll is kind of useless for the aiming system). It is using the internal magnetic sensor for the heading (compass) and GPS receiver for coordinates.
All this information changes dynamically and it is super-imposed over live video image from phone's digital camera. One can adjust colors of the HUD data and control the iris (exposure compensation) - very useful for use in bright, sunny day. (I am thinking of making some sort of rigid hood for the display to enhance further the contrast in bright ambient light and reduce glare). There is also a nice calibration procedure - very useful to account for differences between each installation.


The Digital Scope system works fantastic and brings the spud guns to the 21st century!! I think I'll apply for a patent on this one:)


Update: I am currently working on a BBTS or Basic Ballistic Trajectory Solver for the Android OS. The idea is to be able to input the distance to the tree, assuming the tree will be located under the peak of the trajectory, Tree Height + some padding , Tennis ball weight (for drag force calculation, I have data for the average drag coefficient of a tennis ball), Air density/Altitude (again for drag) and additional drag value (caused by line, the ball is pulling - there is no easy way to model this so it needs to be determined experimentally and entered as correction to the drag force)

The output will be a firing solution - Angle and required Muzzle Velocity. The tricky part will be to establish the correlation between the air tank pressure and the initial velocity of the ball leaving the barrel, but I'll work on a way to figure it out (police radar?).

Saturday, April 23, 2011

"Say Hello to my little friend!"

Update: If you are looking to buy an Antenna Launcher for Field Day, please check this post.

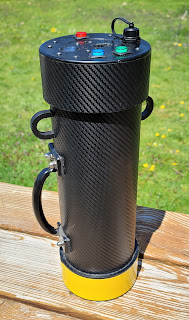
Tony Montana's famous words as the answer to the question: How do you get an antenna rope over a 100+ ft tree-top? Forget about slingshots or bow and arrows. Even the crossbow with optical sight is so last century :). Enter: the pneumatic antenna launcher or shall I say "pneumatic blunderbuss";-)Here is the result of a couple of evenings spent in the garage - cutting, gluing and painting PVC pipes.
This antenna launcher is based on (WB6ZQZ) Alan Biocca's CSV19 with some modifications / improvements on my part. His web site (http://www.antennalaunchers.com/) is an excellent source of information on these launchers and it has very detailed build instructions. I had to do something about the white PVC look which I REALLY hate! The paint job was inspired by K4ICY and his "Steampunk" antenna launcher.
The main changes from Alan's CSV19 design are:
- Slightly larger compressed air tank - my launcher is using 10 inch length of the 4" diameter pipe for the tank vs. Alan's 8 inches. The reducing coupler I am using as part of the tank gives a little extra volume too.
- Longer barrel - 18.5 inches vs. Alan's 16 inch barrel - I had lengthen the barrel a bit in order to account for the larger pressure vessel and have enough clearance for the Zip Reel.
-More reliable and safer pressure vessel - instead of drilling a hole for 1" pipe and epoxy gluing the pipe for the high pressure outlet in a 4" end cap, I am using a 4" to 2" reducing coupler and then 2" to 1" reducing bushing as part of my pressure vessel. Another advantage is that I don't have to drill precision large diameter hole - unfortunately I don't have a lathe.
-More reliable and safe coupling between the barrel and the high-pressure pipe - I am using 2.5" to 2" reducing coupler and 2" to 1.25" inch reducing bushing. It is much easier to assemble the launcher that way! Alan's design yields for drilling a 2.5" end cap and epoxying the 1.25" inlet (actually, a 90 degree elbow) in the hole
-I made the spacer between the pressure tank and the barrel out of two pieces PVC, sliced from 4" pipe scrap. I adjusted the curvature of each piece to follow the outside diameter of the corresponding pipe and glued the pieces back-to-back.
-In a moment of sheer brilliance, I came up with the Augmented Reality Digital Scope. The HUD (Head-Up Display) on the scope shows the firing angle of the barrel (pitch), heading, roll, and geographical coordinates. It is also capable of measuring distance and most importantly height of an object (tree). (Scope is not shown on the picture above)This is probably the most significant improvement to the launching system I am willing to take credit for as it allows to correct your shots in a precise manner by adjusting the exact angle of launching. About the only thing I am missing is on-screen display of the air pressure in the tank. More on this in a later post...

The main source of PVC hardware for this project was http://flexpvc.com/. Trigger, pressure gauge and Schrader valve are available from McMaster (the trigger is part 6852K11). Rainbird 100DV-SS sprinkler valve is from eBay. The bow-fishing zip reel is from an online archery store. Brass fittings, brass street elbow and aluminum stock (for the Zip reel mount and support strut) - all from Home Depot. Tennis balls and Spectra line (150 yards spool / 50 lb test) from Sports Authority. For all threaded connections (sprinkler valve to trigger valve, pressure gauge, Schrader valve) one should use the yellow type Teflon tape - it is made specifically for gas/high-pressure applications and seals much better than the standard white plumber's tape. I hated the rattling sound of the coins (used to bring the weight to 4 oz) inside the tennis balls so I injected the balls with polyurethane foam (used to fill gaps). For the tennis ball tie, I used a loop of string with a knot, drilled a penny right in the center and inserted the loop thru the hole. The knot should be large enough so it cant go through the hole. Then I inserted the penny vertically in the tennis ball thru the narrow slit I previously made. When I pull on the loop, the penny wedges flat across the slit - this solution works just fine and after I filled the ball with foam there was no need to stitch the slit - the foam glued the slit and the pennies inside.


This picture shows the installation of the Saunders Bowfishing Zip Reel. Two aluminum bars are attached to the zip reel and the 2.5" coupler is mounted in the center with countersunk screws. (the bottom side of the coupler was filed flat to form two "saddles" for the mounting bars). It is loaded with 150 yards of high-visibility Spectra-Line (50lb test). I even installed a little cutting blade (the yellow thing on the bottom) for added convenience. This line cutter was part of the Spectra Line packaging - i just had to cut it out from the plastic spool-holder.

Update: In the original design the trigger valve could loosen or over-tighten if one is not careful - the valve is not fixed - it relies entirely on the thread and because it must not go all the way in (the street elbow is just partially threaded, 2-3 turns max), accidentally rotating the valve in either direction could cause a variety of unwanted effects.

Alan, WB6ZQZ suggested to use a strut to support the trigger so this is what I came up with. Small piece of curved PVC (scrap 4" pipe, heat gun, 2.5" pipe used as a form for bending and sanding) is drilled for a countersunk screw then glued to the barrel with the screw in place to create an anchor point. An aluminum bar is used as a strut between the anchor point and a brass trigger outlet extension. The red cable-tie is the "safety" (currently in ON position) - it prevents accidental operation of the trigger.
Another solution for the strut anchor point is to drill, countersink and install the screw from inside of the 2.5" to 2" coupler BEFORE the 2.5" barrel pipe is glued. The hole for the screw should be drilled in the middle (or closer to the edge) of the 2.5" portion of the coupler and the countersinking should be deep enough to allow for smooth installation of the barrel after the screw is inserted. There is not much clearance for right-angle drill -the countersink can be done with RA Dremel attachment or manually by hand.

Monday, December 6, 2010

Flight Simulator Update

Lately, I've been working on a compete update of my flight simulator. The new configuration is a setup of 4 machines. The server machine is an IBM Intellistation Z-pro (dual CPU)/ 2 x Xeon 3.8 GHz(2MB L2 Cache)/4GB RAM/1TB SATA disk/nVidia Geforce FX 8800 Ultra - it is the mainframe for the MS Flight Simulator X and the Wideview server software. There are 3 panoramic view render clients - each of them is an Intellistation M Pro, dual xeon/2GB RAM/72GB Ultra160 SCSI/nVidia Geforce 6800 Ultra. The clients render Left, Front and Right Panoramic cockpit views ( separate copy of FSX + Wideview clients). The panoramic view display is composed by 3 x 23" Widescreen LCDs (made by Accer) connected via DVI cables.
Currently only 2 render clients are online as the front view is rendered by flightsim server. In the final configuration, I'll have the server displaying the instruments panels, control panels and the GPS on two separate monitors and the front view will be rendered by a dedicated machine. The whole display setup in its final version will be composed of 3 monitors for the 135 degree panoramic cockpit view (top row) and 2 additional monitors for the instrument panels (bottom row).
For the radio stack, autopilot control panel and the switch panel I am using separate hardware panels (by Saitek). The flight controls are Pro Flight Yoke system and throttle quadrant and Pro Flight Rudder pedals by Saitek.
The major item left to be completed is the display setup. I have to figure out how to raise the panoramic view monitors so I can have the instrument panels on the bottom row. I'll post pictures once the whole setup is completed.
I've done some crude testing (using 3DMark06 ) to compare Quadro FX 4600 vs. GeForce 8800 Ultra. Both cards are based on the same G80 nVidia chip and are very similar - the Quadro is the "pro" version with a few extra hardware features enabled and using special drivers aiming at high accuracy rendering. The Geforce is the "Gamers" version where high FPS is the primary goal - the G80 nVidia chip is a bit overclocked in the "Ultra" version. The test was done in 1920 x 1080 dual monitor setup /w 2x2 AA enabled and bilinear filtering. As it turned out the Geforce 8800 Ultra is the faster card so I am using it in the main flight sim box.

Tuesday, September 28, 2010

N2PK VNA Transverter options

The N2PK VNA frequency range can be extended by using transverters. While the N2PK VNA covers the entire 0.05 to 60 MHz, additional frequencies are covered only on specific bands. Paul, N2PK and Ivan, VE3IVM developed two transverters in order to cover the 2m and 70 cm amateur bands.

Both transverters share exactly the same design and PCB with only a few differences in the BOM - the frequency of the Local Oscillator (180 MHz for the 2m version and 400 MHz for 70cm) and the the components of the Band Pass Filter (different set of components for each filter, changing their frequency range).
I started with the 2m transverter kit from Ivan, VE3IVM. It was an easy and pleasant build - Ivan provided a partial kit - PCB, LO, BPF coils, balun transformer for the bridge, both mixers and a power splitter- the rest of the BOM is from Digikey.

The top side of the PCB. The 4 coils of the BPF are shielded, each in its own compartment. It is important that they are centered and lifted from the ground plane in order to increase the Q and minimize losses. The other components are the LO, both mixers, RA SMA connectors and the voltage regulators - +6V and +5V. The most time consuming task here is to make and install the shield for the BPF coils - a certain level of precision is required while fabricating the RF shield as the tolerances are not very large. The top cover is soldered during the finalization stage. I used tin-plated brass sheet to make all RF shields - this material is very easy to form and solder.

Most of the components are installed on the bottom side. Again, a lot of attention is required when building the BPF and the bottom shield for it. After adjusting the BPF, the bottom shield is installed and the filter is checked and re-aligned again as the shield might de-tune it a little. The attenuators are pretty small and should be soldered very carefully. Same thing goes for the 100 Ohm 0604 bridge resistors. The two amplifiers should be soldered carefully to avoid over-heating. Ivan provides specific instructions for installing the variable caps - no flux (or very minimal) should be used and the board must be washed with alcohol or flux remover to avoid mechanical damage to the trimmer capacitors. This picture shows an incomplete and bypassed Low-Pass filter on the low-side output. The jumper is removed and the rest of the components are installed during the finalization stage and after final alignment of the BPF.

This is a plot of the BPF frequency response from the initial alignment of the filter. I was aiming at 143 MHz - 153 MHz range. The BPF filter design allows for almost 10 MHz bandwidth in the 2m band and 20 MHz at 70cm. It can be moved a few MHz up or down from this general range if needed just by adjusting the variable BPF capacitors. During the alignment, it is important to achieve as flat as possible band-pass response and proper shape of the skirts. MyVNA really simplifies the use of transverters and takes care of all calculations - the user must enter the LO frequency and frequency range for the high side and myVNA translates this to the VNA's HF working range, while making a plot in the transverter's frequency range.

This picture shows the 70 cm transverter. The most visible difference between the two transverters is the configuration of the band-pass filter. For instance, on the 2m transverter there are some BPF capacitors mounted on the top side just under each coil - they should be installed before the coils are soldered. These are omitted in the 70cm version.

The BPF frequency response of my 70cm transverter. The insertion loss at 70cm is higher then the one of the 2m transverter at about -13 db. It can be lowered to up to -6 dB if some of the bandwidth is sacrificed but I wanted to cover the whole 430 - 450 MHz range.

The finalized PCB. Shown here is the completed Low-Pass filter and the RF shielding of the BPF. As Ivan, VE3IVM noted in his build instructions, after installing the BPF shields they will slightly de-tune the filter. As expected, I had to re-align it again. A fence-type shield was installed to divide the up-convert and down-convert paths in order to reduce stray coupling and cross-talk.

Almost done. I installed a toroid choke on the power line. Ivan has designed the PCB to fit in a compact extruded aluminum box - Hammond 1455C801. The board fills up the space with very little room to spare - just enough for the RF choke. It was a bit tricky to drill the holes for the SMA connectors in both panels so they match perfectly the RA connectors - the board has a small horizontal play which helps it a little. A small piece of conductive RFI gasket material (neoprene covered with metalized fabric) is pinched between the base of the RA SMA conectors and the front aluminum faceplate in order to improve grounding of the aluminum enclosure.

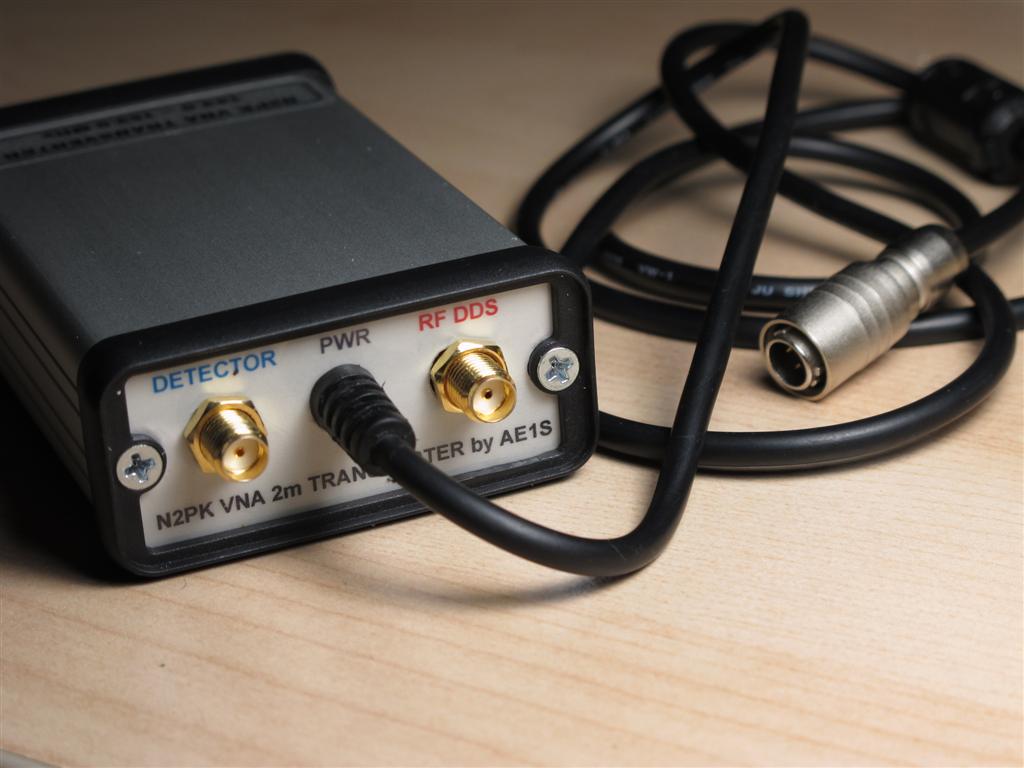
This is the front panel. The labels on the top row are for Transmission mode measurements and the ones on the bottom - for Reflection. I made the small jumper (needed to configure the transverter for Reflection measurements) out of semi-rigid hand-formable RG-405 coax and used a spacer made from a strip FR4 board to fix the distance between the connectors.. The Hammond box is assembled in a way so the plastic trim for the front and rear panels is on the outside (instead of the "normal" way - between the enclosure and the panel plate). This improves the RF shielding as the end panels are in direct electrical contact with the enclosure - there is no gap.

The rear panel and power cable. The Hirose connector for the power cable is the same type that I am using with my RF-IV test head. The accessories connector on the VNA's back panel provides +9V DC and I can power the RF-IV or the transverter directly from there. Two small semi-rigid coax jumpers with Male-BNC to Male-SMA are used to attach the transverter to the VNA's ports. Each of the transverter's ports has a Male-SMA-to-Female-SMA port saver installed (not shown).

Friday, September 17, 2010

3.5mm VNA Calibration Standards

Lately, I've been obsessing with calibration standards. I know that it is an overkill to use lab-grade calibration kit rated for up to 26 GHz with a home-brewed 60 MHz VNA, but the commercial calibration kits are well documented and come with cal reference definitions (data about offset delay, stray C for the OPEN, stray L for the SHORT, etc. The data is stored on a disk and normally loaded in the VNA but it will give me chance to properly measure/characterize my DIY calibration kit. This way I can have the proper constants for my DIY standards entered in MyVNA software. It will also help me to match the calibration plane with the port connector mating plane and measure other connectors or adapters.
I picked up a nice calibration kit on eBay for a very reasonable price (these kits are normally VERY, VERY expensive, but I guess I was lucky this time). The kit is equipped with 3.5 mm connector. This type connector was developed by Hewlett-Packard and it is used in lab instruments for microwave measurements. The 3.5mm connector is using air dielectric and it is machined to extremely tight tolerances. It is rugged (compared to the SMA), allowing thousands of connect-disconnect cycles with repeatable results. The beauty is that it mates with standard SMA connectors. On the flip side - it is a precision lab grade connector and one should be extra careful when handling and using - it could be easily damaged when mated with low-quality SMAs or by poor mating technique.

The geometry and construction of the 3.5 mm connector provides mode-free operation up to 34 GHz. My kit is actually made of two different sets - the male cal standards are rated for up to 26 GHz and the female for up to 9 GHz. Such kit requires proper care and storage. The male pin and female receptacle are supported only in the back of the connector (air dielectric) and can be damaged by rough handling/cleaning. Enemy #1 of these connectors are low-quality or already damaged SMAs. When mated with such, a damage is almost certain to occur.

"DO NOT ROTATE"! This is very important rule when the 3.5 mm calibration connector is mated! The cal standard must be held / clamped in a way to prevent any rotation of the whole cal standard body - only the nut should be rotated. This is especially important with the female connector! The pin receptacle of the female connector is EXTREMELY DELICATE!

The female pin receptacle under 10x magnification. Note the 6 contact fingers, lining the inside wall of the pin receptacle. They are barely visible on the picture under 10x magnification and even people with very good eyesight could not always see with a naked eye if there is a damage. When the body of the connector is rotated during mating or any of these contact fingers gets caught by a burr on a low-quality male SMA center pin, the whole calibration standard becomes a very expensive paper-weight. A center pin, protruding too much, pin with out of specs diameter, misaligned pin, improper cleaning attempt are just some of the things that can cause irreversible damage to the female receptacle. The male pin of the 3.5mm is more rugged but still requires a lot of attention when mated or cleaned.

Tuesday, September 14, 2010

VNA Calibration Reference Plane

Having different types of calibration standards helps to cancel out the measurement error introduced by the use of connector adapters. If the DUT has a port type different from the one of the VNA, the use of "between series" connector adapters is inevitable. Using a calibration standard which mates with such adapter will move the calibration reference plane at (or close to) the DUT, "absorbing" the adapter in the calibration process. Speaking of calibration reference plane - the concept is very simple - the reference plane is the plane which divides the VNA-DUT system. Everything "behind" the plane belongs to the instrument and will be taken out of the measurements. Calibration is performed at the plane. Everything at or "in front" of the plane is treated as DUT and it will be measured. Often, calibration device can not be placed exactly at a specific plane inside the VNA's port connector or test fixture due to the standard's physical size and/or need for a connector. There is an electrical length associated with the cal standard (pin / mating plane to actual OSL plane) which will cause a small delay and phase angle error (such standards are called an "offset" type). To account for this phase shift, commercial calibration kits come with a floppy disk containing correction data for the offset among other parameters (for instance - the stray capacitance for an OPEN or the stray inductance for a SHORT). After calibration is performed and the corrections are applied to the calibration model, the reference plane is "moved back" and located at the port's mating plane. For this very reason, when a calibration standard is measured as DUT with already calibrated VNA, it doesn't look "perfect" - the VNA shows the standard's internal phase offset and strays.
An excellent technical article about calibration standard definitions by William Highton (Chemandy Electronics) can be found here.

The main reason for matching the calibration reference plane and the mating plane of the VNA test port connector is to allow industrial VNAs to measure whole assemblies and devices, including their connectors. In the N2PK VNA (at least with the original software) the reference plane is assumed to be where the physical OSL calibration takes place. Instead of adding negative offset to move the reference plane back to the mating surface of the VNA's test port connector, it is accepted that the plane is right at the rear surface of the calibration standard connector (the location of the actual Open-Short-Load). The error introduced by the electrical length of the pin inside the connector is not that great at lower frequencies - for instance, assuming teflon dielectric (VF ~70%) in a standard SMA connector used for a home-brewed calibration standard, an offset of 5 mm will yield about 0.5 degree phase error @60 MHz. Commercial calibration standards use air dielectric, but this puts greater mechanical requirements during the fabrication process. By calibrating the VNA so the reference plane is on the back of the cal connector and fully exposed, it is more convenient to measure a single component but it means that the DUT test fixture should be made of (or at least include) the same type connector as the one used for the home-brewed calibration standards in order to maximize the accuracy. The setup can be as simple as the component (DUT) is just soldered on the back of the "test fixture" connector, while measures are taken to minimize external error (minimal lead length). With SMDs, this approach works well as the device is practically located directly at the "reference plane" when the test fixture connector is from the same batch connectors used to make the OSL standards. Another method for calibration is to use the test fixture connector itself for calibration - for OPEN the DUT is simply omitted, SHORT and LOAD are created on the spot during each calibration step and finally the DUT is soldered (Still, stray C for the OPEN must be known)

Tuesday, July 27, 2010

Alinco DM-340MVT meter illumination

Alinco makes very solid and well engineered power supplies. I am using 3 such supplies to power my shack - a switching power supply DM-330MVT (very light and compact) and two linear DM-340MVT (big, heavy and totally noise-free). I am so fond of these power supplies - I'll probably never use anything else. The DM-340MVT is one of the best linear supplies I've seen - a real work horse and it keeps going. The only thing that it lacks is illumination of the otherwise very nice "high-visibility" V/A Meter combo. I like to keep my shack dark and illumination of the meters is essential for me. This mod is nothing special - it is rather simple and easy to do but I received a few emails asking about the illumination of the meters so here we go...

The outer edge of the meter's plastic bezel is transparent and can facilitate easy side-lighting of the meters. As a "bonus", the plastic has "prismatic" finish around the edge and acts as a light diffuser, resulting in a more even illumination of the face. I attached two yellow-orange high-intensity LEDs (clear lens, from RS) with hot melt glue in the middle, right under each meter (~1/4" away from the bezel - this widens the beam and covers more area). It might take some experimenting with the position of the LEDs in order to achieve best results. This is actually the most difficult part as the space is very tight to get the glue gun in and to fix the LEDs in the right position. The LEDs can be any color - i just like the warm orange glow - it reminds me of the long gone tube radio era.

Two current limiting resistors (470 ohms) and a filtering capacitor (100 uF/10V, to avoid flickering as the 5V DC in the LED circuit is rectified by a single diode) were inserted in heat-shrink tubing and then attached with hot melt glue to the bracket holding the meters in place.

The LEDs are powered by the same circuit, powering the front panel "ON" LED. There is a second winding in the power transformer, used to supply the regulator board with 5.5V (hence the 0 to 15.5V adjustment range). The AC is rectified by a couple of diodes - one for the voltage regulator circuit and one for the front panel LED. This picture shows where my illumination circuit is connected on the regulator board - the positive lead is taken from the "hot" side of the front panel LED current limiting resistor (just after the diode V5) and the negative lead is on the 3rd pin (from the right, looking at the front panel) of the connector (black wire).

This is how the meters look in a well lit room...

... and in the darkness of my ham shack.

... also, by "popular demand" - the schematic diagram of this overly engineered mod (just one 0.5 W resistor can be used instead)

Monday, April 26, 2010

SMA Port Savers

The SMA connector is excellent miniature RF connector used mainly for internal interconnects in low-power HF-to-Microwave applications. One thing to keep in mind is that this connector is not recommended for applications where repeated connect-disconnect cycles are required. In fact the SMA is rated for only about 500 mating cycles (for a high-quality one and as low as 50 cycles for the lower quality) and only if a great care is taken during mating. The connector should be tighten to a specified maximum torque using a proper torque wrench (torque is determined by the type - brass or stainless steel). Usually, the source of failure is the female connector (speaking of "delicate":-). The pin-receptacle contacts in the female connector are easily damaged or worn off . This makes the SMA connector unsuitable as "port connector" in lab instruments or any front-panel/real-panel applications where heavy use is expected. APC, N type of BNC/TNC connectors are used instead. My personal preference is to use 1) N-type and 2) BNC. The TNC is actually better than the BNC - it provides better mechanical support and more reliable connection but it is less popular, requiring frequent use of adapters and/or custom test cables.
A possible solution to the SMA's durability problem is the so-called "port saver". This is an "in-series" SMA adapter - male-to-female. It is connected to the port connector and provides a "disposable" extension - after the adapter's front-end is damaged or worn off, it can be quickly replaced (and at a low cost too). This way, the actual front panel port sees very little use and there is no need for a complicated and time consuming replacement procedure.

Unfortunately, the "port saver" is not very well known/used adapter and it might be difficult to obtain. Thanks to eBay I was able to get a bunch for a couple of dollars a pop! An even better choice would be the stainless steel version. When disconnecting devices, 5/16 wrench should be used to prevent the port-saver from unscrewing.

Saturday, April 17, 2010

N2PK VNA - SMA calibration standards

For my home-brewed SMA calibration standards I used the construction method, previously used for my BNC standards.

The Open, Short and Load standard are made of Male SMAs for PCB. The back side of the center pin of all three connectors is trimmed down to ~0.5 mm - the height of a 0603 SMD component. In addition, the SMA test fixture has its center pin also trimmed at 0.5 mm for improved solderability to the DUTs.

For the SHORT standard, I used a small teflon washer (cut from the center dielectric of a MIL grade coax) placed on the center pin. The thickness of the washer is ~0.3-0.4mm. This washer serves as an insulator in order to raise the actual "short" to the very tip of the 0.5 mm center pin stub, (the back plane is covered with silver bearing solder to short the pin). For the LOAD standard I used the same Vishay FC series 50.0 ohm (0.1%) high-frequency precision resistor as the one in my BNC standards set (Digikey p/n FC0603-50BWCT-ND). This type of resistor is the preferred component for the LOAD - it is designed with maximum precision and minimal reactance at high frequencies.

For mechanical protection, RF shielding and easy handling, I used sleeves made of brass tubing (Stock #135, K&S Engineering, 3/8 x .014") to cover the back side of each connector. Each sleeve is 1 cm long and it is soldered on the inside wall to the 4 ground pins of the SMA connector. The end cap is made of closed-cell foam and it is held in place by the heat-shrink tubing. The OPEN standard also has an additional rear RF shield made of a tin-plated brass disc, soldered to the inside wall of the sleeve. The OPEN is more sensitive to stray RF than the others and must be fully shielded. Such shield could be installed on the LOAD as well. The SHORT does not need one as it is self-shielded.


In addition, I made a set of female standards in order to cover DUTs with any port gender. I used PCB female SMA connector (round base) and the brass sleeves were made of Stock #134, K&S Engineering, 11/32 x .014"

The complete SMA calibration kit. Heat-shrink tubing is used for color-coding and it gives a nice and smooth finished surface, protecting the brass from tarnishing.

Saturday, April 10, 2010

New Callsign - AE1S

My original Technician class callsign was KB1FZA. After I upgraded to Extra class I decided to get a shorter 2x1 callsign (I didn't trust the systematic change to come up with a "good" callsign) and opted for a Vanity Callsign. My first choice was AE1S - it all made sense - these are my initials. At the time AE1S was assigned to Joseph Craddock and I got AE1Z - it was pretty close to what I wanted (Z almost looks like a mirror image of S :-). I must admit - I had a really nice run with the AE1Z callsign.
Sadly, Mr. Craddock became a Silent Key on March 22, 2008 (R.I.P.). FCC was made aware of this at the end of 2009 and canceled his callsign. There is a two years waiting period mandated by FCC before the callsign is released in the general pool. This waiting period ended on March 22, 2010 and once the callsign was available, I immediately applied for it.
My application was granted today and my new (and probably last) callsign is now AE1S.
My last contact as AE1Z was HK1NK on Apr 3, 2010, 21:20 UTC on 10 meters / QRP.
It is time to start a new logbook! The change is a bitter-sweet one! AE1Z signing off!

Friday, February 5, 2010

10 000 visitors and counting

Two years since I first published my SteppIr BigIR Mrk III dissection / review page , the web counter is at 10 000 visitors (only unique IPs are counted). It is a small anniversary and makes it worth all of the effort to create the web page! Enjoy!

Thursday, January 28, 2010

It's a boy!

For lack of better words - the happiest day in my life! Today, Jan 28, 2010 at 4:26 Eastern Time my first harmonic - Vichren Andrey-Endri Stoev was born! He is 9 lbs 3 oz and 21 inches tall. Absolutely a MIT (or Cal Tech - have not decided yet who is going to have the honour ;-)) material - one can tell from first sight! (His crib is furnished with the basics - netbook, shortwave transceiver and CW trainer). Mother and baby are doing very well!

Thursday, December 31, 2009

BulbDial Clock

The idea about an "Indoor Sundial Clock" is not a new one. There are many patent applications filed over the years (some dating back to 70s), describing such devices. It is one of those "how come I didn't think of this" type of ideas - simple yet brilliant. David Friedman of ironicsans.com described such device with a nice illustration (he might have come to this idea independently from the other inventors or not, but he is one of the first with a nice visual instead of the boring wording in patent applications). That's how the name of this clock came about - The Bulb Dial Clock. It was only natural, this idea to be picked up by Evil Mad Science and turned into a really nice kit. The kit is based on the Arduino platform, using Atmel AVR controller (ATmega168). When I saw the kit, I knew I had to have it - such a brilliant idea as a very well executed project = a must-have cool gadget!
I ordered the kit from Evil Mad Scientist as soon as it was made available.

The kit quality is simply superb. Extremely high quality PCBs and components! Everything is absolutely "top-notch", including the nice laser-cut enclosure (available in a few different styles). All components are sorted by type in labeled plastic bags and packed very well. Included in the kit are a few spare parts - LEDs and mounting hardware. The manual is not provided with the kit - it is available for download and it can be printed. A few words about the manual - probably the best kit manual I've seen lately (maybe even over-done) and it beats Heathkit! The kit is designed for beginners and the manual even includes a section on soldering. If you never held soldering iron, you should be still OK - just follow the instructions.

The build is straightforward. The most tedious part is installing and aligning the 72 LEDs located on 3 PCBs. This is the main BLUE PCB - it includes 30 blue LEDs for the "seconds hand" as well as the AVR controller and most of the components. The clock has 2 seconds and 2 minutes resolution - in other words - the "seconds" hand moves every 2 seconds and the "minutes" hand - every 2 minutes. This is actually not too bad - imagine dealing with 132 LEDs for full resolution - it would be crazy ! When LEDs are switched on, it can be done with "fading" which gives a nice smooth "analog feel" and makes up for the 2 seconds resolution (it actually interpolates the "in between" state)

There is a connector for accessing and re-programming the ATmega chip. I wish they had provided a socket for the IC in the kit. I felt that it is much safer to play with the firmware if the PIC was socketed, so I added a socket. There is also a provision for an on-board IC voltage regulator should one decides to use non-standard power supply. The design is very simple - ATmega168 chip, crystal oscillator (20ppm), a few current limiting resistors, 3 buttons and a charlieplexed matrix of LEDs. The source code for the firmware is open and the schematics are freely available for download - all in the spirit of the Arduino platform.

This picture shows the main board with the nice "bulbdial" face installed on stand-offs. There is machined gnomon in the center which casts the "shadow hands" The GREEN PCB is for the "minutes" hand and it has 30 green LEDs. The picture also shows the special laser-cut "LED leads forming tool" . All LEDs need to be pointed downward and aligned to produce nice centered hot-spot. There is an alignment mode in the firmware to assist this task. One should gently bend the LEDs. Sometimes it is necessary one of the solder joints of the LED to be heated with the soldering iron, while aligning the LED body in order to reduce the mechanical stress.

This the last of the 3 PCBs - the "hour hand" RED PCB. It has 12 red color LEDs.

The little circular board in the center of the picture is the optional ChronoDot. This board contains a high-accuracy real-time clock (RTC) based on the DS3231 chip. This option improves a lot the accuracy of the Bulbdial clock - without it the clock will drift aprox. +/- 2 min per month. With the ChronoDot, the clock will be accurate to +/- 2 minutes per year. This high accuracy is achieved by the built-in 2ppm Temperature Compensated Crystal Oscillator (TCXO) inside the RTC chip. The ATmega firmware will automatically detect if the ChronoDot is installed and will start using it instead of the software timers. One added benefit of the ChronoDot is the 3V Lithium battery on the back of the PCB (not visible)- it is good for up to 8 years and keeps the time even when the clock is powered down.

This is the completed PCB assembly. The LEDs of each board must be aligned before the next board is added to the stack. Power supply adapter is provided with the kit. The clock can also be powered with the optional programming cable (USB-TTL-5V) but only if the power supply is not connected. There is no ON/OFF switch. The Z (sleep) button is on the bottom side which is not the most convenient place - I wish the buttons were more accessible.

All 3 boards are inter-connected with 10 zero-ohm resistors (jumpers) and held together with threaded stand-offs and stainless steel hardware.

There are 4 modes of operation - Time Displaying Mode, Time Setting Mode, Alignment Mode and Optional Configuration Mode. The modes are selected by pressing and holding combinations of buttons. Once the clock is powered, it goes into Time Displaying Mode. In this mode the Z button is Sleep ( it turns off the display) and "+" and "-" control the brightness level.

There are a few different case styles offered with the kit. The case by itself is an optional item. The enclosure is made of laser-cut acrylic for the front and back faceplates and thin, flexible plastic elements for the sides to create the classic "mantle clock" look.

If all LEDs are properly aligned, the gnomon in the center will cast nice centered shadows in the LED's hot-spots. Because of the height of each LED ring above the face plane and the angle of the LEDs, each of the three shadows has different length much like the hands of a real clock. The kit that I got is with RGB LEDs but it is also offered in a "monochrome version" using only white LEDs for yet another style.

I just couldn't resist the "geeky" look with transparent front plate to show off the internal construction. IMHO it looks very cool, with a futuristic "tech feel"!

There are 7 user-adjustable brightness levels and even a "white balance mode", where the brightness of each color can be adjusted separately. At the highest brightness level the clock could almost serve as a night light. All of the configuration variables are stored in the ATmega's eeprom space. There is also a user-selectable "rear-projection mode" where the movement is reversed (CCW) in order to be viewed through the back if the clock is equipped with a semi-transparent face.

The Bulbidal clock is a fun project and the resulting clock is just beautiful to look at.